
Recently a client wanted to remove the pagination on the collection page and to add a load more button. The functionality will be great from a UX point. No need to change the page to see more products. And it’s much faster. Let’s get started.
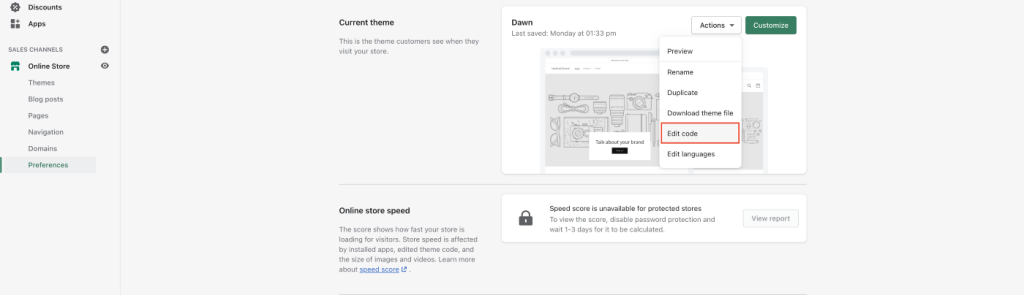
First, we go to the backend of our Shopify store. Then Online store then we find the theme we want to add the functionality and click Actions and Edit code.
Then we need to find the Collection template. The template might call a section if you use Shopify 2.0. Then go to this section and locate:
{% if paginate.pages > 1 %}
{% endif %}
This is the code that contains the pagination. If the collection has more pages than 1 then show the pagination. Our code will go inside this if. We can then remove the whole code from the if. And will create a custom element called load-more.
<load-more class="load-more_wrap"
           data-next-url="{{ paginate.next.url }}"
           data-current-page="{{ paginate.current_page  }}"
           data-total-pages="{{ paginate.pages }}"
           data-page-size="{{ paginate.page_size }}"
           data-total-items="{{paginate.items}}">
 <button class="load-more_row button button--secondary js-load-more" type="button">View more</button>
  <div class="load-more_row">
   <span load-items-count>{{ paginate.page_size }}</span> out of {{paginate.items}} pieces
  </div>
</load-more>
You can change it the way you see fit. You can style the button and change the text.
Now we can add the javascript. You can add it to theme.js. Or you can add it to the bottom of the same file you are in. Just add script tag. This way this code will be called only on the collection page.
<script>
class LoadMore extends HTMLElement {
 constructor() {
  super();
  this.addEventListener("click", this.loadMoreItems);
 }
loadMoreItems() {
 const loadMoreBtn = this.querySelector('[type="button"]');
 loadMoreBtn.setAttribute("disabled", true);
 let { currentPage, pageSize, nextUrl, totalItems } = this.dataset
 let nextPage = parseInt(this.dataset.currentPage) + 1
fetch(nextUrl.replace(/page=[0-9]+/, 'page=' + nextPage))
 .then(response => response.text())
 .then((responseText) => {
  const html = responseText;
  $('.changeOne')
   .append($(html)
   .find('.changeOne')
   .html());
  })
 .catch((e) => {
     console.error(e);
  })
 .finally(() => {
  loadMoreBtn.removeAttribute("disabled");
  this.dataset.currentPage = parseInt(this.dataset.currentPage) + 1;
  let isLastPage = parseInt(totalItems) - (nextPage * parseInt(pageSize)) < 0
  this.querySelector('[load-items-count]').innerHTML = isLastPage ? parseInt(totalItems) : nextPage * parseInt(pageSize)
  isLastPage && loadMoreBtn.setAttribute("disabled", true);
 });
 }
}
customElements.define('load-more', LoadMore);
</script>
We are almost finished. Something really important. What we do. We make a get request to get the data from the second page and then append the products to the current page. So to work you need to change two things.
First, open your page and find the container that holds the products. We don’t want to append the whole page with the header, footer etc. Only the products.
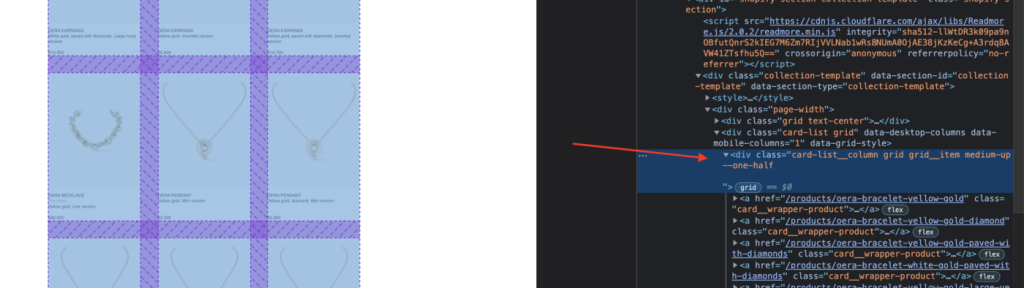
Now open your website open the dev tools and find the container that holds all products. Here in this container, we will append the products. When you find it get the class or id. Then in the javascript find changeOne this is where to append the new products and change it with your class. There are two changeOne. You need to change it to both places. The first is where to append the products, the second is to find the products on the second page and append-only the products.
Now you can test it.
BONUS
You can hide the View More button when there are no more pages. Just add some CSS.
button.js-load-more:disabled {
  opacity: 0;
  visibility: hidden;
}
You can do it with display:none as well. But this way the numbers for the products below the View More button will keep the same place.
- Category:
- Shopify